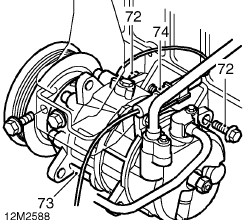
| Air conditioning. 71. Raise hoist sufficiently to gain access compressor bolts.
72. Remove 4 bolts securing compressor to bracket on cylinder block. 73. Release compressor from bracket and tie aside. 74. Disconnect compressor multiplug. All models 75. Remove front engine mounting. 76. Raise hoist, tilt engine with gearbox as low as possible and using assistance manoeuvre and lift engine and gearbox from vehicle. Refit 1. Using assistance, lower engine and gearbox into engine bay. Air conditioning 2. Position compressor to mounting bracket. 3. Fit bolts securing compressor and tighten to 25 Nm. 4. Connect compressor multiplug. All models 5. Position front mounting and align engine and gearbox to rear mounting. 6. Fit engine rear steady bar and align to engine bracket and body. 7. Loosen RH engine mounting through bolt, align mounting to to engine fit bolts and tighten to 75 Nm. DO NOT tighten through bolt. 8. Align front mounting to crossmember and tighten bolts to 45 Nm. 9. Lower hoist, disconnect and remove lifting bracket 18G 1598. 10. Fit and tighten engine rear steady bar bolts to 45 Nm. 11. Tighten RH engine mounting through bolt to 45 Nm. 12. Fit front mounting top nut and tighten to 90 Nm. 13. Fit rear mounting lower nut and tighten to 90 Nm. 14. Clean and lubricate clutch slave cylinder push rod. 15. Position clutch slave cylinder, fit and tighten bolts. 16. Remove plugs from oil cooler pipes and hoses, clean unions and fit NEW ’O’ rings. Connect hoses to pipes and tighten unions. 17. Fit RH drive shaft. See DRIVE SHAFTS, Repairs. 18. Fit LH drive shaft. See DRIVE SHAFTS, Repairs. 19. Clean exhaust flange faces and fit new gaskets to intermediate pipe and turbocharger outlet elbow. 20. Fit front pipe to intermediate pipe and align to turbocharger outlet elbow. 21. Fit turbocharger heat shield bracket and tighten exhaust flange nuts to 45 Nm. 22. Secure front pipe to rubber mounting.
|