Rover 825SD 800 Coupe 825i SD1 and Land Rover Web Site
![]()
These pages for contributed material.
| Easy Head Removal | Edward McAllister |
| Need Helicoiling? | Charles Weaver |
| Steering racks Interchangeability | George Chic |
| Engine and Gearbox a few things to look out for | John Walton |
| Front Suspension Top Arm Bushes | Chris Bromley |
| Water Pump Replacement | Chris Bromley |
| Auxiliary Drive Belt | Chris Bromley |
| A warning about working on the steering | Bruce Moxon |
| Low water light coming on Cylinder head leaks | Bruce Moxon |
| Drive shaft vibration Power steering rack fails. | Bruce Moxon |
| Oil burning, inlet tract or turbo? | Bruce Moxon |
| An easy way to refurbish / replace the clutch slave cylinder | Edward McAllister |
| Heater or Glo plug test and replace | Richard Thomas / W Whittaker |
Easy Head Removal. By Edward McAllister.
|
I tried the official rover line but after some experimenting I have found a remarkably pain free method of head removal on my 825 SLD. 1. Drain the radiator 2. Remove rocker cover breather hose then remove rocker cover. 3. Remove the 4 nuts that attach the manifold to the Turbo unit. 4. Remove E.G.R valve 5. Remove the heat shield 6. Remove the twin clamps holding the injector inlet pipes, you do not need to remove the 4 way clamp. 7. Using a 28 mm socket available from Sealey, remove injectors. 8. Undo the feed to No 1 glow plug, remove all electrical push on connectors on the front of the head. 9. Remove coolant manifold. 10. Remove air hose to the inlet manifold (4 allen bolts) 11. If Air Con fitted, slacken the pipe that runs along the side of the head just under the thermostat housing. One bolt is located on the coolant pump and the other just behind the main belt tension pulley. 12. Remove rocker assembly and push rods 13. Remove the 4 oil feed banjo bolts. 14. Undo the head cylinder bolts in the correct order. 15. Slide the entire heads assembly to the right (looking at the front of the engine) then angle up over the four manifold bolts. 16. Remove heads assembly from vehicle. Time to do? About 1 - 1½ hours. Once the entire assembly is out, you can then strip and renew as necessary. Here's the trick though. You must place the heads back squarely on the block and you can't do this with the manifold bolts intact. Before replacing the heads, remove the manifold assembly and then remove the 4 8mm bolts. When replacing the heads and manifold, use 1¼" M8 bolts, these just squeeze in to the manifold, you'll see what I mean. The head gaskets are available at £20 each plus VAT and the exhaust manifold gaskets are £1.75 each. You should really change the copper compression rings when replacing the oil feed banjo bolts. WARNING: When replacing the push rods, be aware that they can fall past the camshaft. If they do, it's goodbye time and a total engine strip down to recover it. I think it a good idea to tie a piece of fishing line round the push rods and remove them after re-assembling the rockers. You can do the whole thing in a morning. Charles Weaver suggests that while you have the heads off, check to see if the rocker studs need to be Helicoiled, the studs pulling out of the casting is a known occurrence. Also replace the heater "Glo"plugs. Especially as number 2 plug can only be changed with the head off or by removing the injection pump. See Heater Plugs |
An easy way to refurbish or replace the clutch slave cylinder By Edward McAllister.
Front Suspension Top Arm Bushes by Chris Bromley
|
The top arms of the suspension are mainly positional linkages and take very little stress. The rubber bush is not a high duty 'forced in' type as with most other suspension components and very rarely gives trouble. The linkage is important, however, as play in the bush means that the top of the suspension upright can move fore and aft, giving woolly steering and 'clonks' when you hit a bump. If the bush does wear, however, obtaining spares can be very difficult. A kit is supposed to be available but is expensive and very rarely to be found and the only other alternative is a new arm complete - even more expensive and also rarely available. A little lateral thinking will come to the rescue, however. The top arm is very easy to remove from the car. It's not under any stress and three bolts removed will have it on your bench in a few minutes. First disconnect the ball joint at the top of the suspension upright and then the two bolts under the bonnet holding the support bracket and that's it. On the bench, remove the through bolt holding the arm and bracket together. Very carefully take note of the order of the nuts, washers, spacers and rubber bush - it's important. You will see that the rubber bush is a push fit in the inboard end of the arm and that it has a steel inner bush to take the through bolt. If the rubber bush is worn it will be a sloppy fit in the arm. Remove the old bush off the steel inner bush and we are ready to make a new one. Now for the good bit. Take a length of old black car inner tube rubber. This is fantastic stuff, oil and UV proof, very high quality rubber and available free for the asking from any tyre fitting depot. Cut a strip of it just bit wider than the bush housing in the arm and about six inches long. Using superglue, stick one end of the strip centrally on to the steel inner bush (yes, rubber sticks really well with superglue). When it is firmly fixed, keep some tension on the rubber strip and wind it carefully on to the steel bush, superglueing as you go. You need to build up the thickness of the laminated bush you are making until it is just too big to push fit easily into the arm. I found that, with the rubber I had, just over two full turns were enough. I also found that the easiest way to do the job was to grip one end of the steel bush in a vice with the majority of it standing vertical. When you have the required thickness and the superglue has grabbed, cut off the loose end of the strip. You now have a 'swiss roll' like laminated rubber bush made of high quality material that will work well for you. Trim the rubber to length with a sharp blade using the inboard end of the arm as a guide. Now, using copious amounts of washing up liquid, force the bush into the arm. If it won't go in, trim some of the rubber away. If it goes in too easily, cut the rubber off completely and start again (hey, the raw material is cheap). Once the bush is in place simply reassemble the through bolt assembly and bolt the whole thing back on the car. Mine has now run for over a year and 10,000 miles with no sign of wear. |
Water Pump Replacement by Chris Bromley
|
A steady drip from the water pump drain tube told the story that a replacement pump was needed. My local spares shop provided one within 24 hours at a very reasonable price but, as with many other 825D jobs, fitting wasn't simple. This is what I found to be the best way. The main problem is that you can't lift the pump away from the engine, even if you can get spanners on the three retaining bolts. The only solution is to raise the offside of the engine about three inches. Use a trolley jack to take the weight of the engine. Do NOT jack under the sump. Mine is a plastic moulding and probably so is yours. From underneath, look at the rear offside corner of the sump and you will see that the bottom corner of the engine block is not covered by the moulding and there is a substantial ledge of metal. My jack held on this quite easily. With the weight on the jack, remove the offside top engine mount through bolt. The engine will now be free to lift and you can jack it up two or three inches very easily. Remove the water pump belt idler wheel assembly. It's an easy job and gives you much more spanner room. You have to adjust it later anyway so you might as well take the bolts out when you loosen them. You can now get spanners on the waterpump with no problems and the pump itself lifts away cleanly - and it all goes back together very nicely too. |

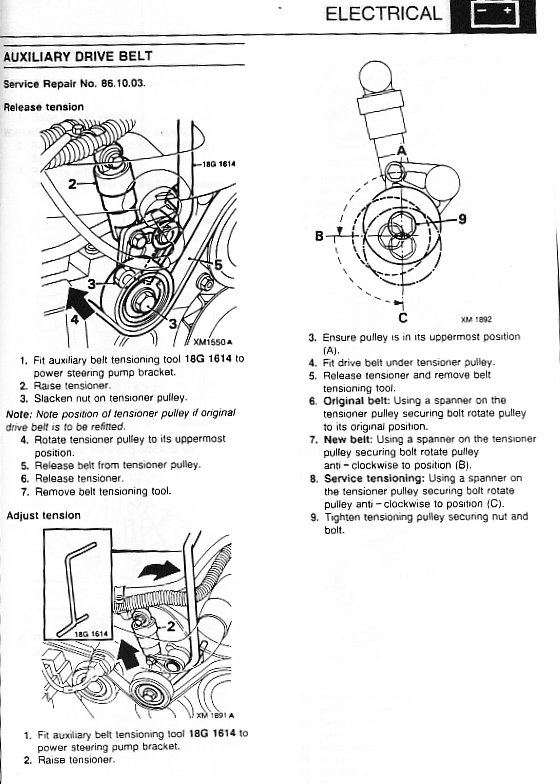
Auxiliary Drive Belt by Chris Bromley
|
Replacement time for the drive belt is hard to judge but keep an eye on the distance from the drive belt tensioner wheel to the power steering pump pulley. As the belt ages and stretches, this distance will decrease. When it gets down to just under 10 mm, replace the belt. Don't leave it any longer as you really don't want to know what happens if the belt runs start to touch each other. When replacing the belt, don't try stripping the spring/damper unit down and expect to just slide the belt into place and then re-fix the damper. The spring is far too strong for you to be able to do that. Use a long (thin and strong) lever against to steering pump body to compress the spring/damper unit and get somebody else to slip the belt into place. Auxiliary Drive Belt Tension Wheel Watch out for bearing wear on the auxiliary drive belt tension wheel. It's easy to spot as the wheel starts to 'lean' slightly. If you don't catch it early, the wheel will start to rub on its mounting bracket and it will generate an increasingly generous amount of metal swarf. The noise will probably be masked by the usual 825 racket so you might not spot it. Just under this potential swarf factory if the alternator with it's cooling fan just waiting to distribute the swarf into the alternator body and the result will be one faulty alternator to replace as well as the tensioner wheel. You can all have one guess about how I know this. |
| Racks listed for the diesel car
GSR3349 same for 2ltr T normally aspirated and VM pre 96. GSR3383 same for 2ltr T normally aspirated and VM post 96. I've swapped a normally aspirated rack onto a Vitesse , could not tell the difference and it worked so a Vitesse one will probably fit too. |
|
From past experience there have been problems with head gaskets failing, and core plugs within the heads corroding and causing mysterious coolant leaks. Also some engines (early types) with manual adjustable tappets had problems with rocker pillar studs pulling the thread out of the heads. The gearbox is very tough, but can suffer with input shaft bearing failure (rough rotating noise with clutch released).
|